
Spooky2’s cutting-edge biofeedback scan technology provides a deeply personalized wellness experience. In addition to our four core biofeedback options (Pulse scan, TENS scan, Sample Digitizer scan, Scalar Digitizer scan), Spooky2 offers more advanced options to take your wellness journey to the next level. This article will help you understand the mechanism of Spooky2 Hunt and Kill biofeedback scan and how it can be done.
What Is Hunt and Kill
The preset begins with a biofeedback scan. The hits found are then run on any nominated generator. When the killing process completes, the previous hits are re-analyzed. Pathogens running for cover are then discovered, and hit again. The Hunt and Kill preset runs automatically until it is actively stopped or no new hits are found. This preset saves the repetitive BFB scanning work and allows thorough eradication of pathogens.
Step-by-Step Operation
Using GeneratorX Pro to Perform the BFB Scan
Single Generator
- Select a corresponding Hunt and Kill preset. Use GX Hunt and Kill (C) – JW for TENS scan or Hunt And Kill (SD) – JW for Sample Digitizer scan. Please note that if you are using a single Sample Digitizer to run Hunt and Kill, the sample has to contain DNA information. Step-by-step guide for TENS scan is available here; for Sample Digitizer, please read here.
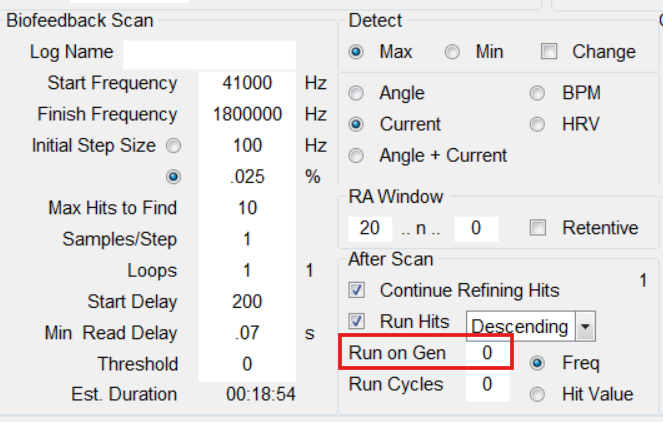
- Set Run on Gen= 0 in the After Scan section in the Control tab.
- Overwrite Generator. Click on Scan to start.
- When the initial scan finishes, do not move the setup as the killing process will automatically start.
Dual Generators
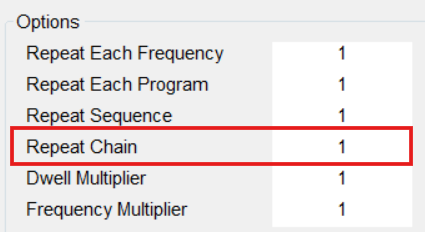
- Select a Killing shell that corresponds with your killing mode. Please note that if you wish to run killing with remote mode, you need to set the Repeat Chain to 1 (or higher if you wish to run the hits longer) in the Programs tab. Overwrite the generator that is designated to run the killing process.
- Select a corresponding Hunt and Kill preset. Use GX Hunt and Kill (C) – JW for TENS scan or Hunt And Kill (SD) – JW for Sample Digitizer scan. Set Run on Gen= [The Generator to Run Killing] in the After Scan section in the Control tab. Overwrite the generator that is designated to do the BFB scan and click on Scan to start.
- When the initial scan finishes, do not move the setup as the killing process will automatically start.
Using Spooky2 Scalar to Run Hunt and Kill
If you wish to run Hunt and Kill with Spooky2 Scalar, you only need one GeneratorX Pro and one set of Spooky2 Scalar device with Scalar Digitizer. 
Scalar Digitizer biofeedback requires the use of both G1 and G2. It is important to make a note of which port numbers correspond to G1 and G2 before running the scan.
- Connect Spooky2 Scalar Digitizer to the link cable connector on the Scalar Transmitter.
- Connect G1 Out 1 to the BNC port of Spooky2 Scalar Digitizer.
- Connect G2 Out 1 to the BNC port of the Spooky Scalar Transmitter.
- Select the Spooky2 Scalar Digitizer Hunt and Kill Slave (GX) – JW preset. In the Output Control section in the Settings tab, set Out 1= [G1 Port Number]. Overwrite G2.
- Overwrite G1 with the Spooky2 Scalar Digitizer Hunt and Kill Master (GX) – JW preset. Hit the Scan button for G1 Master preset.
- G2 will start automatically to transmit frequencies, whereas G1 starts to record the responses.
- When the scan finishes, G1 will automatically run the hits. G2 will also run the hits, because it is slaved from G1. Once the frequency hits have run, the scan / run cycle will repeat until stopped OR no more hits are detected.
For more detailed hardware connection instructions, please refer to this post.
Tips
- While you can run Hunt and Kill using a single Sample Digitizer, it is recommended to use a separate mode to perform the killing process.
- Stop all other treatments when doing a biofeedback scan. Do not run other programs on the same generator during the scan.
- Do NOT use TENS scan or Scalar Digitizer scan if you have any electronic implant such as a pacemaker. And do NOT place your TENS pads over the heart area or anywhere above your shoulders.
- Spooky2 Sample Digitizer is designed exclusively for analyzing the sample itself. For a comprehensive full-body scan, TENS contact scan remains the recommended method.
I don’t understand step 2.. what liquid sample? .. what does two black E’s mean, and what does ‘clip the slides’ mean? I am new to Spooky but instructions are confusing for me 🙁
Step 2:
After placing the liquid biological sample on one slide, place the other slide on top. The two black Es must face each other.
Clip the slides with the Sample Digitizer, and insert it into the Out1 port of the G2 of GeneratorX Pro.
Dear friend, this blog explains use gx pro to do a biofeedback scan. liquid sample is used for doing biofeedback scan. And the picture in step2 is Slides, and then you will see that it looks like the two black Es in the middle. There is a video about how to use Spooky2 Sample Digitizer: https://www.youtube.com/watch?v=T4nzmA1glKU&t=184s. Also have some relvant blogs here: https://www.spooky2-mall.com/blog/spooky2-sample-digitizer-guidelines/, https://www.spooky2.com/digitizer-remote-scan/. Hope it helps. Any questions, feel free to contact our official email: support@spooky2-mall.com. Here we’ll have someone help you with more detail! Thanks for your understanding! 🙂
Is there a forum for spooky?
Dear lori, yes, here is the link of Spooky2 forum: https://www.spooky2.com/forums/. Welcome to join us!
SP2 Is to be congratulating on establishing such a good support facility. It remains essential for SP2 to continue providing support on every level and for absolute beginners, it may be useful to have an “idiot proof”, set of beginners instruction with photos and instructions at every step. As users continue to use the equipment, they learn about the system and when confident will welcome the early guidance given. Do not be embarrassed at the simplicity of support because there are many users out there who will buy and benefit from SP2 equipment but do not know how to switch on a PC!
I agree. The learning curve is beyond high and some of the videos are confusing. Even with screen captions there are times I still do not understand each so called “step”. The narrator is often not an English first language speaker. With the captions on (I am hard of hearing in one ear and deaf in the other) some of the material is blocked and must repeat the videos several times to attempt understanding, and even then, I am not confident that I truly “get it”. Steps that a new user does not know are assumed as known. Also, what should I do with the biofeedback hits after running a scan? The video I watched didn’t say. Many times, I feel like I am running in the dark and bumping into who knows what.
Thank you for reaching out. I’m sorry to hear about your challenges with the learning materials and accessibility issues. Your feedback highlights important areas for improvement. Sorry for your bad experience.
To get the best guidance, I recommend contacting the official Spooky2 customer service team email:support@spooky2-mall.com
They can provide detailed instructions, troubleshooting help, and personalized support.
And our support website is a great resource for any questions you may have. Feel free to explore and search for information you need. The website address is as follows:https://www.spooky2support.com/hc/en-us
Have a good day!
Can you also do Hunt and Kill with contact?
Dear friend, yes you can use GX/GX Pro to do hunt and kill with contact. Here is a blog about it: https://www.spooky2-mall.com/blog/how-to-do-gx-tens-scan/. Hope it helps. Any questions, feel free to contact our official email address: support@spooky2-mall.com.
Where can I find training sessions. I cant locate them on the website.
Bradley did a good training on this, as well.
Thank-you for all you do for us.
Dear friend, thanks for your approval and praise! You can find it in our channel, and this is the link of biofeedback scan training course: https://www.youtube.com/@Spooky2Rife/search?query=biofeedback%20scan%20training%20course. Hope it helps. Any questions, feel free to contact our official email address: support@spooky2-mall.com.
It looped 3 times and then switched to run the results on G1 Remote. All good. Another question-it’s running the results on my remote however the preset is Hunt and Kill (SD)-JW. Is this correct?
Dear friend, yeah that’s correct. If you have any questions, feel free to contact our official email address: support@spooky2-mall.com. Here we’ll have someone help you with more detail! 🙂
Why set G1 to do biofeedback scan when the digitizer slide is on G2?
Why set G2 to run scan results when the remote is on G1?
Isn’t it the wrong way round?
Confused.
Dear David, so sorry to make you confused. We made some mistakes, which have now been corrected. Maybe you can read this blog again. If you still have any questions, feel free to contact our email: support@spooky2-mall.com. Here we’ll have someone help you with more detail! Thanks for your understanding! 🙂
The instructions mention using generator GeneratorX Pro. Does this mean that if I use GeneratorX (without Pro) biofeedback Hunt and Kill will not work properly? Thank you for the information.
Dear Jaroslav, they are equally effective, we just didn’t list gx, so sorry for the trouble. 🙂
so to summarize…. with the xmpro …run sample dig on g1 and y have the remote on g2. so run the results on the remote on g2 yes?
Dear friend, yes, you connect the Sample Digitizer to the Out1 port of the G1 of GeneratorX Pro for scanning and then connect the Remote to the BN port of the G2’s Boost for running the results of the scan. Any questions, feel free to contact us via email: support@spooky2-mall.com.
Hi, Is it possible to do a Hunt and kill scan using the XM Generator with tens pads? Rather than the GX pro. If so how do I go about doing this? Is there an article about it please?
Dear Anne, we prefer you use GX/GXPro for hunt and kill. Any questions, feel free to contact us by email.
I “think” I understand the process … you place the blood sample in the Sample Digitizer … that goes into G1. You connect the remote to the G2, in the BN connection. If you have the same sample in the G1, but the virus is in your body, how does the XPro know to hunt and kill viruses that morph, if there isn’t a new sample in the G1?
Thank you for your question. When you place a blood sample in the Sample Digitizer on G1, the Spooky2 XPro analyzes the frequencies from the sample, which represent the pathogens in your body. Even if the virus in your body morphs, the system detects these changes through the ongoing frequency analysis. The “Hunt and Kill” process continuously scans and adjusts to target any new or evolving frequencies associated with the pathogens. This means you don’t need to update the sample in G1, as the system adapts to the changes in real-time.
If you have further questions or need more clarification, feel free to ask!
You’re saying that the viruses in the sample may be attempting to morph, and if that is taking place in the sample, the G2 is adjusting the output based on how the sample is “morphing”? However, if the sample is “dry” how is there a virus within the sample anymore?
how do you save the results to a program to run the frequencies at another time with a hunt and kill as it continues on with the kill?
Dear Robin Dylan,
Thank you for your inquiry!
To save the results of a Hunt and Kill Biofeedback scan and run the frequencies at another time while continuing with the kill process, please follow these steps:
1. Complete the Hunt and Kill Scan: Once the scan finishes, Spooky2 will automatically generate the detected frequencies.
2. Save the Results: Click the “Save” button in the results window. Name your file and save it in the default folder or another location of your choice.
3. Create a Custom Program:
– Go to the “Programs” tab in Spooky2.
– Click “Create Program.”
– Import the saved results file and assign the settings for the kill frequencies.
4. Load and Run the Program:
– Navigate to the “Control” tab.
– Load the generator you will use.
– Select your saved program and start the session.
This allows you to rerun the saved frequencies and continue the killing process when needed.
Feel free to reach out if you need further assistance.
Best regards,
Spooky2 Support Team
Hello, how do you do a hunt and kill on Contact? Not a general contact scan, but a hunt and kill. Will you have to be hooked to the the machine all day until no more frequencies are hit?
Hi Edd,
To perform Hunt and Kill using Contact mode, you will need to stay connected to the machine during the process. Spooky2 will continuously scan, detect, and run frequencies in real-time until no new frequencies are found. It’s an ongoing process, so it’s best to do it when you have enough time to stay connected.
Let us know if you need further guidance!
Best regards,
Spooky2 Team
Hi
I would like to check
Once the scan is done on the sample & you have the frequencies, the killing program runs on dna in three remote on the other generator – Is it necessary to leave the digital sample scanner connected with its sample?
Hi Cheryl,
Thank you for your question.
Once the scan is complete and the killing program is running on your remote generator, you do not need to keep the Sample Digitizer connected with the sample.
1. Hunt and Kill Preset
Starts with a scan, then runs hits on a remote generator.
Automatically re-scans and updates hits if pathogens mutate.
Sample only needed during the initial scan.
2. Scan and Run Preset
Scans, runs hits, and repeats until stopped or no hits are found.
Sample must remain in the Sample Digitizer the whole time and be replaced daily.
We recommend running a Baseline scan before all GX biofeedback sessions for better accuracy.
For more details, please check the Biofeedback Scan section in the Spooky2 User’s Guide.
Let us know if you need further assistance.
Best regards,
Spooky2 Team
Can you please example the set up for the hunt and kill using scalar? Do we set up the transmitter and generator the same as doing a biofeedback scan but just pick hunt and kill instead?
“explain”, not example
Hi, like some others I fins some of this very challenging…would be good in the videos to do steps more slowly with clear explanations that can be understood….many of us are challenged with learning issues like dislexia for instance….am getting some of it, but I need to take it all slowly. Thank you for this incredible machine.
Thank you so much for sharing this.
You’re absolutely right, some of the training can feel fast or overwhelming, especially when you’re learning something completely new. We understand that many users process information differently, including those with dyslexia or other learning challenges. You are not alone in feeling this way.
We recommend watching the video; it might be helpful to you. https://www.youtube.com/watch?v=St90Ri-658M
If there’s a specific part that feels confusing, feel free to let us know, we’re happy to help clarify it step by step.
hello, how long in general does the biofeedback scan on 2 cycles using remote and sample digitizer hunt and kill run?
thank you
Taffy
Hi Taffy. The total run time varies between individuals. It is designed to run continuously until no new pathogen frequencies (“hits”) are found or until you actively stop the program. The total duration can vary from hours to days.