Unboxing video
- Spooky2 GeneratorX (with power supply) x 1
- Spooky2 Boost 3.1 x 2
- Spooky2 Remote v2.0 x 2
- Customized Spooky2 Portable Case x 1
- Velvet Bags x 1
- User Manual x 1
Simple Software Installation Guide
1. Download the software:
Go to www.spooky2.com/downloadspage/ and click on the Spooky2 Starter Pack to download it.
2. Install the software:
A. Go to either your Download, Quick Access or Recent Folder and extract all files from the downloaded Spooky2 Starter Pack zip file.
B. In the new window that opens, go into the Spooky2_Starter_Pack folder.
C. Go into the Spooky2 setup folder. Then double click the Spooky2 setup application and follow the prompts on the screen.
D. When the installation is done, tick “Yes, launch the program file,” then click the “Finish” button.
E. Spooky2 will launch. You will see a “No generators detected” alert.
F. Click “Yes” to install drivers, and the driver installer will launch. Please follow the prompts on the screen.

When the driver installation for the Spooky2-XM generator completes, click Finish. Now you have Spooky2 software successfully installed.
PS: Spooky2 software will be in test mode if you don’t connect a generator to the computer.
Here is the video of installing the software and drivers:
Simple Software Operation Guide
We need to choose and connect Spooky2 Generator with accessories before launching Spooky2 Software. After launching software, please follow the below steps to operate software and run program:
Step 1: Choose Preset
There are two types of presets:
1. Factory Preset ( It includes software setting and programs )
2. Shell Preset ( It only includes software setting and we need to choose programs under Programs tab )
![]()
Step 2: Choose Programs under Programs Tab
PS: How to Choose Keywords when Searching in Spooky2 Software
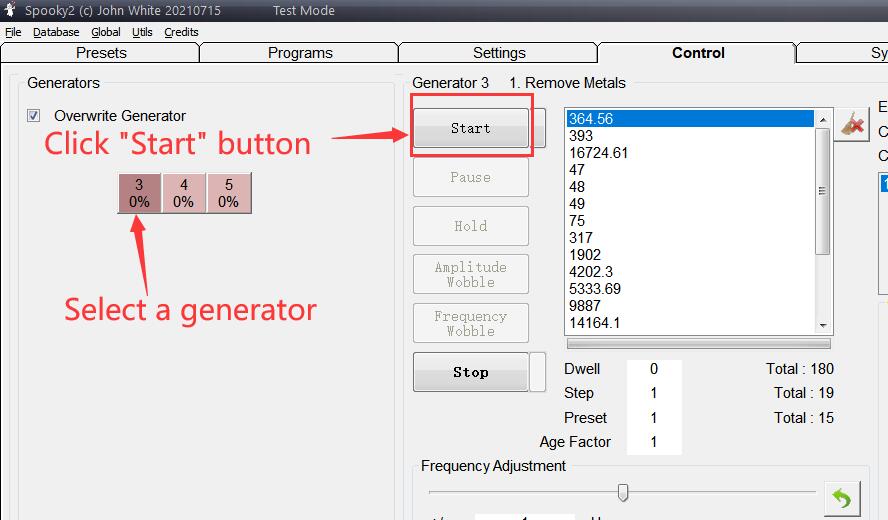
Step 3: Go to the Control Tab, tick ” Overwrite Generator “

Step4: Select a generator which you are going to use
Step 5: Click the ” Start ” Button
Tips
Before you use Spooky2 to tackle any problem, you have a number of very important things to consider first:
Which mode – plasma, contact, or remote?
Plasma: well-designed and implemented plasma is the quickest and the most powerful rife machine. The very best of today comes from the Spooky2 Team-Spooky2 Central.
Contact: it is popular for its speed and power.
Remote: Scalar DNA treatment. The convenience of Remote Mode makes it a winner.
There are considerable benefits to combining your transmission type. Our recommendation is to do one Plasma or Contact session on one issue every day and then switch the generator to Remote Mode. That way, you get the best results from all prospects.
And click this link for What are the differences between Remote, Contact and Plasma Modes?
Essential First Step for Spooky2 Users
It is important to run the Terrain Detox Protocol before anything else when you first get your Spooky2 kit. The Terrain protocol makes your body more receptive to Rife frequencies.
Click this link for details: https://www.spooky2-mall.com/blog/essential-first-step-for-spooky2-users/
Protocols:
Spooky2 Software includes Terrain protocol, Big C Protocol, Morgellons and Lyme Protocol, etc. You can find them under Preset Tab.

Running a Rife Program
To start a Rife program, there are three simple steps:
1. Connect Spooky2 accessories.
2. Turn on the generator before launching the software so that the generator can be detected.
3. Launch Spooky2 software and choose presets and/or programs to run.
Factory presets include software settings and programs. The remote mode example below shows how to run a factory preset. And how to run a shell preset is shown in the contact mode example below.
Tips:
In order for the software to detect the generator, it’s necessary to turn on the generator before launching the software.
Under Preset tab, (R) stands for Remote Mode; (C) stands for Contact Mode; (P) stands for Plasma Mode.
Which mode to choose: Healing or Killing?
Killing is better for a pathogen-related program/preset, like bacterial, viral, or other biological factors. Otherwise, Healing will be a good choice, applying to almost everything else that is not targeting a pathogen.
Click this link for details: https://www.spooky2-mall.com/blog/how-to-distinguish-healing-and-killing-frequency/
Remote Mode Terrain
The new Spooky Remote v2.0 can be used for both healing and killing presets, with more consistent results. And there’s no fatigue after long-term use. DNA can be placed anywhere within the holder. What’s more, it is silent no matter what frequency you are running.
Connecting Spooky2 Remote v2.0
Step 1:
First, connect Spooky2 Boost to the generator, and then connect Spooky2 Remote v2.0 to the BN port of Spooky2 Boost v3.1.

Step 2:
Put your DNA into Spooky2 Remote v2.0. It is recommended to use fingernails as DNA sample.
Here’s how to package your nail clippings using paper stickers (included in the package):
1. Put your fingernail on the sticker. Then use another sticker to cover it.
2. Write a name on the sticker.
3. Open the remote to put in your fingernail.
4. Close the remote.

Blog: What Source of DNA for Remote Rife and How Long It Lasts
Video: DNA Sources of Spooky2 Remote and How Long Will They Last
Step 3:
Turn on generator and launch Spooky2 software. Here we will show you how to run a factory preset.
How to run a Factory Preset which includes the programs and settings:
First select>Detox>Remote.
Next, select the factory preset Terrain (R) – BY.


PS: If you choose a Shell Preset, please go to Programs tab and choose programs.
Go to Control Tab, tick Allow Generator Overwrites, open a generator button. After the frequencies are loaded, you can click Start button to start the treatment. Then, you will see both of the LEDs on Spooky2 Remote light up.

PS: Many users were confused about why their remote is not lit, or why does it stop working, etc. Seemingly baffling LED behavior ranging from only one LED lighting to neither of them working was reported.
You can click here for How Does Spooky Remote Light.
Biofeedback Scan
This Remote Kit cannot be used alone for biofeedback scan. You need to buy other accessories to complete your biofeedback scan.
Click this link for details: https://www.spooky2-mall.com/blog/four-ways-of-running-biofeedback-scans/
How to Load the Program and Run GeneratorX Standalone
GeneratorX can be run in standalone mode, which means you can run programs without connecting to a computer. Follow the steps below to learn how to use GeneratorX in standalone mode:
Step 1: Load programs into GeneratorX
Firstly, complete the hardware connection and open Spooky2 GeneratorX, and then open Spooky2 software. Go to Control tab, and you will find two generators that have been detected.
Go to the Preset tab, and choose one Shell (Empty) Preset based on your need. For example, l will choose Healing (R) – JW to help with my bone.

Then, go to Program tab, search the keyword “bone”, and you will find many related programs. Double click or click the “+” button on the programs you want to load. You will see these programs have been added into “Loaded Program” in the lower-left corner. Before you proceed to the next step, check again whether these programs are exactly what you want.

Go to the Control tab, select “Overwrite Generator”. Choose either of the two generators on your GeneratorX. It does not matter if you select generator #4 or generator #5. They both share the same programs. In this example, l will choose generator #4.
Click “Load GX”, you will see a new window pop up.


Below “New Program Name”, give the new program a name so that you can remind yourself what this program is about. If not, it will automatically combine all your program names as titles. Here, l name the program “Bone problems”. Double click on the location you want the program to be stored. You can overwrite an existing program if you like. There are 30 locations which you can store your programs. However, all of these programs should be within the limits of 200 frequencies. Here, l will place them in Location 01.
Then press Save. The “Load Generator box” will close, and the changes will be sent to your GeneratorX. Repeat the above operations, you can download up to 30 programs into one GX.

Step 2: Run programs in standalone mode
After the download is complete, close the Spooky2 software and disconnect GeneratorX from your computer.
Connect Spooky2 Boost and Remote to one generator of your GeneratorX. And then put your DNA sample into Remote.
Press “G1” or “G2” button, and you will see all the programs that have loaded into your GeneratorX.

See more details in this blog: https://www.spooky2-mall.com/blog/how-to-load-the-program-and-run-generatorx-standalone/