

Managing your Spooky2 data can feel overwhelming for beginners, especially when it comes to backing up, restoring, or moving your data between computers. This guide is based on a training session by Michael Goss, a seasoned information technology specialist and experienced Spooky2 user, who has been helping the community understand and manage their Spooky2 systems since 2018. In this post, we’ll walk you through the essential steps to keep your user data safe and accessible, whether you’re setting up a new computer, recovering from a crash, or simply organizing your presets, programs, and biofeedback data.
Overview of Spooky2 User Data
Understanding and managing your Spooky2 user data is essential to ensure a smooth experience, especially when you need to transfer data, recover from a computer crash, or work across multiple devices. Proper data management helps prevent accidental loss and keeps your presets, programs, and biofeedback information organized and accessible.
There are several key types of user data in Spooky2:
- Saved Presets –Stored in C:\Spooky2\Preset Collections\User, these are the frequency presets you have created or customized.

- Saved Programs –Stored in C:\Spooky2\Custom.csv, this file contains all your custom programs and frequency sequences.
- Biofeedback Programs –Stored in C:\Spooky2\BFB_Frequencies.csv, these are the programs generated from your biofeedback scans.

- Biofeedback Raw Data –Stored in C:\Spooky2\ScanData, this folder contains the detailed scan results from your biofeedback sessions.
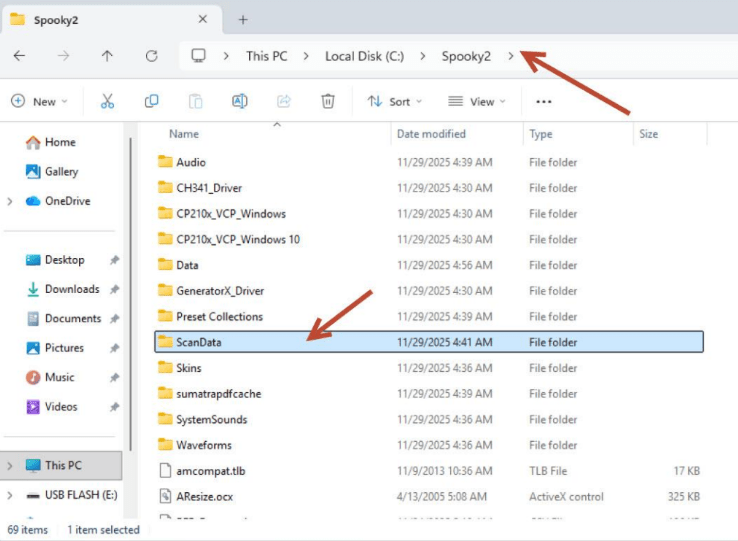

Note: This guide focuses on user files such as presets, programs, and biofeedback data. Working data and system files are not covered in this post.
Backing Up Your Spooky2 Data
Protecting your Spooky2 data is essential to avoid accidental loss or issues from computer crashes. Here’s how you can back up your user data effectively:
1. Manual Backup
You can copy your user files to an external drive, USB stick, or cloud storage. Simply use File Explorer to select the relevant files and folders and paste them into your backup location. This method is straightforward and works well for occasional backups.
2. Using a BAT File for Automated Backup
For a faster and repeatable process, create a BAT file to automatically copy your user data. Here’s an example:
@echo off
rem * Author Michael Goss SpookyTechHelp@gmail.com
rem * Copies all Spooky2 user files to USB drive
set DISK=E
echo Copying Spooky2 user files to USB drive
echo Please insert the USB drive
Pause
xcopy c:\spooky2\*.csv %DISK%:\spooky2-backup\ /d /y
xcopy c:\spooky2\ScanData\*.csv %DISK%:\spooky2-backup\ScanData\ /d /y
xcopy “c:\spooky2\Preset Collections\User\*.txt” %DISK%:\spooky2-backup\User\ /d /e /y
echo Backup complete
Pause
Save this as Spooky-Backup.bat and run it whenever you want to update your backup automatically.
3. Scheduled Automated Backup
Use Windows Task Scheduler to run your BAT file daily or weekly. This keeps your Spooky2 data backed up automatically.
Tips:
- Verify the backup completed successfully.
- Store backups on a separate drive or cloud folder.
- Edit CSV files only in Notepad or another plain text editor (not Excel).
This approach ensures your user data stays safe and easily restorable.
Moving Spooky2 Data to a New Computer
To set up Spooky2 on a new computer, transfer your user data to continue using your presets, programs, and biofeedback information.
| Option | Method | Notes |
| Install & Copy Files | Copy only backup files to C drive after installation | Allows selective transfer |
| Copy Entire Folder | Copy full Spooky2 folder and overwrite C drive | Fast, complete transfer, replaces all existing files |
Copying Spooky2 Data Between Computers
To use Spooky2 on multiple computers, transfer your presets, programs, and biofeedback data as follows:
Presets
Copy the preset folder from the source computer to the target computer.
Programs
- Option 1: Copy the Custom.csv file to the target computer, overwriting the existing file.
- Option 2: Edit Custom.csv in Notepad to copy only the desired programs.
Tip: Do not use Excel. Always back up before editing.
Biofeedback Data
- Option 1: Copy BFB_Frequencies.csv to transfer saved programs.
- Option 2: Copy the ScanData folder to transfer raw scans.
- Option 3: Open Spooky2, click the VG Generator, then Analyze to save the transferred data.
Tip: Copying the ScanData folder avoids editing CSV files and is the safest method.
Merging Files and Editing CSV
When managing Spooky2 data, you may need to merge files or edit CSVs:
- Merging: Presets can be copied by date. Programs (Custom.csv) and Biofeedback (BFB_Frequencies.csv) should be merged by record.
- Editing: Use Notepad or a CSV editor to rename entries, change dwell times, or delete records.
These practices help keep your Spooky2 data organized and safe.
Conclusion
Managing your Spooky2 data may seem daunting at first, but with regular backups, careful migration, and proper CSV management, you can keep your presets, programs, and biofeedback information safe and organized. Take the time to practice these methods and establish a routine—it will save you time and prevent data loss in the long run.
For a deeper dive and step-by-step demonstrations, consider watching the full training session by Michael Goss. The complete course replay provides detailed guidance and practical examples to help you master Spooky2 data management.
🔍 If you have any other questions, you can visit the Q&A page here: Spooky2 FAQs Training Course for additional tips and solutions.
✉ If you have any questions about this live show, please feel free to send us an email at support@spooky2-mall.com.
