Unboxing video
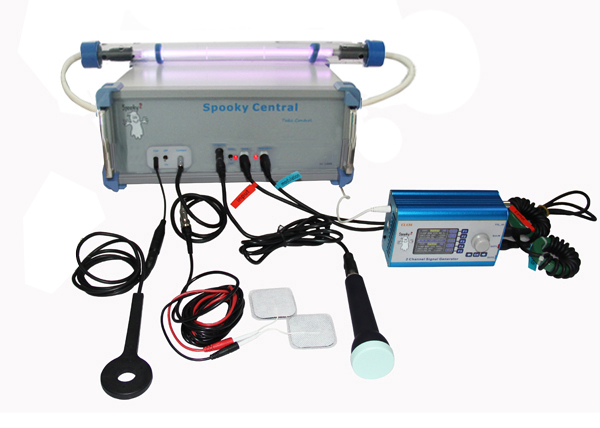
- Spooky2 Central Main Unit (with power supply) x 1
- Spooky2 Plasma Tube (Spooky2 Phanotron Plasma Tub / Spooky2 Straight Plasma Tube)
- USB Filter Cables x 2
- BNC Filter Cables x 2
- Spooky2 Ultrasonic x 1
- Spooky2 Ultrasonic Transmitter x 1
- 3.5mm Audio to BNC Cable x 1
- Spooky2 Tens Pads Bag (with 6 pairs of Tens Pads) x 1
- Spooky2 PEMF Adapter x 1
- Spooky2 XM Generator (with 5-volt power supply) x 1
- Spooky2 GeneratorX Essential Kit x 1
Spooky2 GeneratorX Essential Kit includes:
- Spooky2 GeneratorX (with power supply) x 1
- Spooky2 Boost 3.1 x 2
- Spooky2 Remote v2.0 x 2
- Spooky2 Tens Cable x 1
- Spooky2 TENS pads kit x 2 (complete with 20 pairs of TENS pads)
- Pair Spooky2 Stainless Hand Cylinders x 1
- Spooky2 Cold Laser Twin x 1
- Spooky2 Cold Laser Wrist x 1
- Spooky2 PEMF Coil x 1
- Spooky2 Sample Digitizer x 1
- Spooky2 Sample Digitizer Replacement Slides x 1 (complete with 5 pairs of replacement slides)
- Customized Spooky2 Portable Case x 1
- Velvet Bags x 1
- User Manual x 1
Simple Software Installation Guide
1. Download the software:
Go to www.spooky2.com/downloadspage/ and click on the Spooky2 Starter Pack to download it.
2. Install the software:
A. Go to either your Download, Quick Access or Recent Folder and extract all files from the downloaded Spooky2 Starter Pack zip file.
B. In the new window that opens, go into the Spooky2_Starter_Pack folder.
C. Go into the Spooky2 setup folder. Then double click the Spooky2 setup application and follow the prompts on the screen.
D. When the installation is done, tick “Yes, launch the program file,” then click the “Finish” button.
E. Spooky2 will launch. You will see a “No generators detected” alert.
F. Click “Yes” to install drivers, and the driver installer will launch. Please follow the prompts on the screen.

When the driver installation for the Spooky2-XM generator completes, click Finish. Now you have Spooky2 software successfully installed.
PS: Spooky2 software will be in test mode if you don’t connect a generator to the computer.
Here is the video of installing the software and drivers:
Simple Software Operation Guide
We need to choose and connect Spooky2 Generator with accessories before launching Spooky2 Software. After launching the software, please follow the below steps to operate software and run program:
Step 1: Choose Preset
There are two types of presets:
1. Factory Preset ( It includes software setting and programs )
2. Shell Preset ( It only includes software setting and we need to choose programs under Programs tab )
![]()
Step 2: Choose Programs under Programs Tab
PS: How to Choose Keywords when Searching in Spooky2 Software
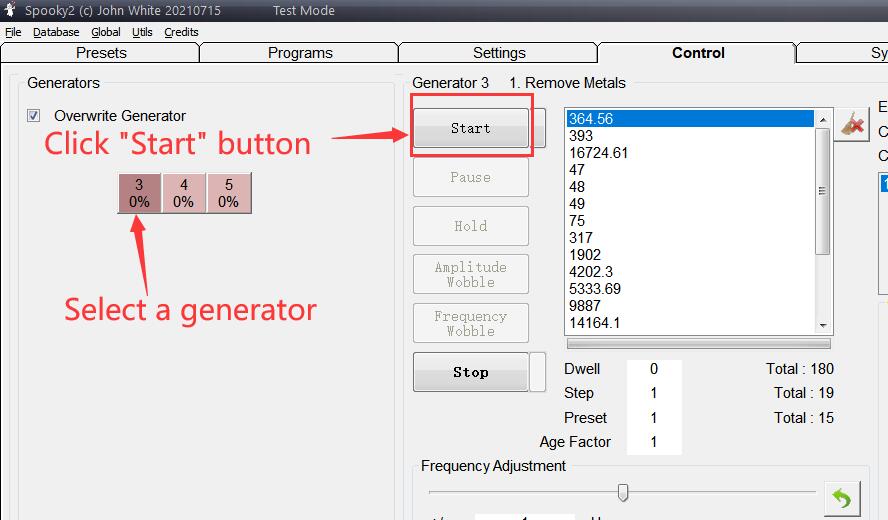
Step 3: Go to the Control Tab, tick ” Overwrite Generator “

Step4: Select a generator which you are going to use
Step 5: Click the ” Start ” Button
Tips
Before you use Spooky2 to tackle any problem, you have several very important things to consider first:
Which mode – plasma, contact, or remote?
Plasma: Well-designed and implemented plasma is the quickest and most powerful Rife plasma machine. The very best of today comes from the Spooky2 Team-Spooky2 Central Plasma.
Contact: It is popular for its speed and power.
Remote: Scalar DNA treatment. The convenience of Remote Mode makes it a winner.
There are considerable benefits to combining your transmission type. Our recommendation is to do one Plasma or Contact session on one issue every day and then switch the generator to Remote Mode. That way, you get the best results from all prospects.
And click this link for What are the differences between Remote, Contact, and Plasma Modes?
Essential First Step for Spooky2 Users
It is important to run the Terrain Detox Protocol before anything else when you first get your Spooky2 kit. The Terrain protocol makes your body more receptive to Rife frequencies.
Click this link for details: https://www.spooky2-mall.com/blog/essential-first-step-for-spooky2-users/
Protocols:
Spooky2 Software includes Terrain protocol, Big C Protocol, Morgellons and Lyme Protocol, etc. You can find them under Preset Tab.

Running a Rife Program
To start a Rife program, there are three simple steps:
1. Connect Spooky2 accessories.
2. Turn on the generator before launching the software so that the generator can be detected.
3. Launch Spooky2 software and choose presets and/or programs to run.
Factory presets include software settings and programs. The remote mode example below shows how to run a factory preset. And how to run a shell preset is shown in the contact mode example below.
Tips:
In order for the software to detect the generator, it’s necessary to turn on the generator before launching the software.
Under Preset tab, (R) stands for Remote Mode; (C) stands for Contact Mode; (P) stands for Plasma Mode.
Which mode to choose: Healing or Killing?
Killing is better for a pathogen-related program/preset, like bacterial, viral, or other biological factors. Otherwise, Healing will be a good choice, applying to almost everything else that is not targeting a pathogen.
Click this link for details: https://www.spooky2-mall.com/blog/how-to-distinguish-healing-and-killing-frequency/
Remote Mode Terrain
The new Spooky Remote v2.0 can be used for both healing and killing presets, with more consistent results. And there’s no fatigue after long-term use. DNA can be placed anywhere within the holder. What’s more, it is silent no matter what frequency you are running.
Connecting Spooky2 Remote v2.0
Step 1:
First, connect Spooky2 Boost to the generator, and then connect Spooky2 Remote v2.0 to the BN port of Spooky2 Boost v3.1.

XM Generator – Remote

GeneratorX – Remote
Step 2:
Put your DNA into Spooky2 Remote v2.0. It is recommended to use fingernails as DNA sample.
Here’s how to package your nail clippings using paper stickers (included in the package):
1. Put your fingernail on the sticker. Then use another sticker to cover it.
2. Write a name on the sticker.
3. Open the remote to put in your fingernail.
4. Close the remote.

Blog: What Source of DNA for Remote Rife and How Long It Lasts
Video: DNA Sources of Spooky2 Remote and How Long Will They Last
Step 3:
Turn on generator and launch Spooky2 software. Here we will show you how to run a factory preset.
How to run a Factory Preset which includes the programs and settings:
First select>Detox>Remote.
Next, select the factory preset Terrain (R) – BY.


PS: If you choose a Shell Preset, please go to Programs tab and choose programs.
Go to Control Tab, tick Allow Generator Overwrites, open a generator button. After the frequencies are loaded, you can click Start button to start the treatment. Then, you will see both of the LEDs on Spooky2 Remote light up.

PS: Many users were confused about why their remote is not lit, or why does it stop working, etc. Seemingly baffling LED behavior ranging from only one LED lighting to neither of them working was reported.
You can click here for How Does Spooky Remote Light.
Contact Mode
Step 1: Connect Spooky2 Boost to the generator. Then connect a pair of TENS pads or Stainless Hand Cylinders to the High-Power port of Spooky2 Boost.

XM Generator – Tens Pads

XM Generator – Hand Cylinders

GeneratorX – Tens Pads

GeneratorX – Hand Cylinders
Step 2: Turn on generator and lanuch Spooky2 Software. You can run factory presets with contact the same way as shown in Remote mode. Here we will show you how to run a ” Shell Preset “, where you need to choose your own programs.
For example, I’d like to treat my herniated disc:
First select > Shell ( Empty ) Presets, and then the > Contact sub-collection. Next, select Healing ( R )–JW.
Move to the Programs tab, type ” disc” into the Search field, and double-click the programs you need.


Step 3: Go to the Control tab——Tick the ” overwrite generator “—— Click the generator button you wish to use —— Click Start to run programs.
Note:
1. Do not use 100% offset for contact mode.
2. Do not put TENS pads above the neck and keep them away from the heart.
Blog: TENS pad placement
3. Do not use contact mode if you have a pacemaker or electrical implants.
4. Do not use more than one contact accessory on your body at the same time.
5. What You Can Do When You Experience Shocks in Contact Mode
6. Why I Don’t Feel Anything During The Contact Session
How to Do Foot Bath Using Spooky2 Hand Cylinders
Cold Laser
Step 1: Connect Spooky2 Cold Laser Twin or Wrist to the Out1 of Spooky2 GeneratorX. Do not use Spooky2 Boost. You can also use the Out1 of your Spooky2 Boost.

XM Generator – Cold Laser Twins

XM Generator – Cold Laser Wrist

GeneratorX – Cold Laser Twins

GeneratorX – Cold Laser Wrist
Step 2: Turn on the generator and launch Spooky2 Software
There are two kinds of Spooky2 Cold Laser Presets:
Spooky Cold Laser – JW is a shell preset, which needs the user to add the programs they wish to run.
Ance ( Spooky Cold Laser ) – JW is a factory preset which has been designed to treat Vuglaris Ance. The same preset can be used for other conditions because it simulates the body’s natural immune system.

Step 3:
Cold Laser Placement
Spooky2 Cold Laser Twin can be inserted directly into your nostrils, ear, navel, or acupuncture points ( meridians). Placing the lasers slightly further away from the target can treat a larger area.
Laser covers are provided for Spooky2 Cold Laser Twin. Clean them with warm, soapy water, rinse and dry between use.

Spooky2 Cold Laser Wrist is primarily designed to be strapped onto the underside of your wrist. This treats your carpel tunnel and the blood passing through the radial artery. It is also ideal to treat larger skin areas if a long treatment time is desired.

Note:
1. Never shine the light of lasers directly into your eyes.
2. Don’t use cold laser over your thyroid.
3. Easy Spooky2 Frequency Imprinting
4. Blog: Spooky Cold Laser Instructions
PEMF Coil
Step 1: Connect Spooky2 Boost to the generator, and then connect Spooky2 PEMF Coil to the High Power port of Spooky2 Boost v3.1.

Step 2: Turn on the generator and launch Spooky2 Software
You can run factory presets with PEMF Coil the same way as shown in Remote mode. Here we will show you how to run a “Shell Preset”, where you need to choose your own programs.
For example, I’d like to help with my back pain:
First select > Shell (Empty) Presets, and then the > Spooky Coil (Generator Direct) – JW.
Move to the Programs tab, type “back pain” into the Search field, and double-click the programs you need.


Step 3:
Go to the Control tab — Tick the “overwrite generator” — Click the generator button you wish to use — Click Start to run programs.
Note:
1. It is recommended to use BN side towards your body.
2. Easy Spooky2 Frequency Imprinting
3. Blog: Spooky PEMF Coil Q&A
Spooky2 Central Mode:
Like Dr. Rife’s original machines, Spooky Central doesn’t require any wasteful and potentially harmful fixed carrier to generate sidebands. It can drive plasma tubes from 100 kHz all the way up to 3.5 MHz without the need for an undesirable carrier frequency.
Spooky2 Central has four modes: Plasma, Ultrasonic, PEMF and Contact. Each mode can be run individually or together for improved results. For example, if you only want to run Plasma mode, you can just connect Spooky2 Phanotron Tube or Spooky2 Straight Tube to the Central box and choose the suitable programs on Spooky2 software. The same goes for the other three modes. You can also run all four modes simultaneously for the most effective treatment.
Related Blogs:
Spooky Central Plasma Instructions
Spooky2 Central Plasma Mode
Spooky2 Plasma has two different plasma tubes: Spooky2 Phanotron Tube and Spooky2 Straight Tube. Spooky2 Phanotron Tube provides stronger and more focused signals so it is recommended for localized treatment, while Spooky2 Straight Tube is suitable for whole-body treatment.
The differences between these two plasma tubes:
1. The gas used in the straight plasma tube is Argon. The Phanotron tube uses pure Helium, the best gas for plasma tubes.
2. The Phanotron tube electrodes provide stronger, more focused signals for localized treatment.
3. The frequency range of Phanotron tube is better than the straight plasma tube.
4. The Phanotron tube has a built-in holder, making the tube safer and more convenient to use.
5. The phanotron tube is for concentrated energy on a given issue, like a localized problem, while the long tube is for scattered issues in the whole body, like disseminated pathogens.

Spooky2 Phanotron Plasma tube

Spooky2 Straight Plasma tube
The effective distance of the Plasma field
Plasma produces two related fields. The one that does the really heavy lifting is the near-field, and this extends six inches from the tube in all directions. After six inches, it becomes far-field, which isn’t as effective as near-field, although it still works efficiently enough to disinfect and clear mold from a home. So it still works on the body, just not to the same extent and power as near-field.
Related Blogs:
Spooky2 Central Contact Mode:
Spooky2 Central Contact mode is designed to open up your cells to better receive plasma treatment. You can use Spooky2 contact accessories: Tens Pads, Hand Cylinder, Tens Contact Kit. Note that it is unsafe to use Spooky2 Tens Internal Electrode with Spooky2 Central.
The contact mode delivers sharp 320 volt spikes one hundred times a second to help the plasma signal deliver the mortal blow. Each spike has a duration of less than 0.5 microseconds.
Spooky2 Central PEMF Mode:
Spooky2 PEMF mode creates Pulsed Electro Magnetic Field, which extends six inches from the coil. PEMF is designed for use with plasma, but it can also be used without a generator connected.
Spooky2 Central Ultrasonic Mode:
Spooky2 Ultrasonic mode is an efficient and powerful way to flood the entire body with frequencies. We are composed of 70% water, so sound waves in our body travel very well.
How to Use Spooky2 Central Mode
The Connection of Spooky2 PEMF Mode:
First, for Spooky2 PEMF mode, plug the PEMF coil into the Coil outlet port.

The Connection of Spooky2 Contact Mode:
We use Spooky2 Tens Pads as an example of Spooky2 Contact mode. Connect the TENS pad to Tens cable and the other side of tens cable to audio cable, then plug the audio cable into the Contact outlet port of the Spooky2 Central.
In addition to Spooky2 Tens Internal Electrode, You can also use other contact accessories, like hand cylinders, contact kit.

There is one switch to control ON/OFF of both PEMF and Contact channels.

The Connection of Ultrasonic Mode
Next, connect the ultrasonic head to the ultrasonic cable, rotating the nut to tighten them, and then plug the adapter into the ultrasonic outlet port.

The Connection of Spooky2 Generator to Spooky2 Central Plasma
Then, we use the Spooky2 XM generator as an example to show how to connect the generator to Spooky2 Central Plasma. Please check the tags on BNC filter cables. It will help you better understand which cable or port to connect to. One end of the first BNC filter cable should be connected to OUT1 of the XM Generator, and the other end to the Input port of Spooky2 Central Plasma. The side of the magnetic circle should be near the generator. In the same way, one end of the second BNC filter cable will be connected to OUT2 of the XM Generator, and the other end to the Modulation port of Spooky2 Central Plasma. Push the cable connector in and turn it 90 degrees clockwise.

Finally, use the USB Filter to connect the Spooky2 generator to your computer. The side of the magnetic circle should be near the generator.

The Connection of Spooky2 Plasma
Let’s connect the plasma tube. I will take Spooky2 Phanotron Tube as an example.
Plug the adapter of the phanotron tube into the outlet. And we need to connect the power plug to an electric outlet, which should be different from the electric outlet of the generator and the computer.

Now, turn on the generator and start the software.
Before choosing a program, we need to power on Spooky2 Central Plasma. The switch light should work.

The Operations of Spooky2 Software
Here, we will run a Cold program as an example.
Now we go back to the Preset tab and choose the suitable preset.
Click Shell (Empty) Presets, >Plasma, choose Spooky Plasma Advanced (P) – JW.

Go to the Programs tab, and enter “cold” as the keyword to search some programs.

Then go to the Control tab, tick “Overwrite Generator”, and click the generator button. Finally, click the Start button.

One of the Input and Modulation LEDs should be blinking and the other one should be stable.
And phanotron tube should light and blink.

Tips:
- Spooky2 Plasma mode and Ultrasonic mode only work when Spooky2 Central is driven by the Spooky2 generator, while Spooky2 Contact mode and PEMF mode can also work well without a Spooky2 generator connected.
- Choose the Shell Preset especially designed for Spooky2 Plasma:

- Notes for Using Spooky2 Central:
- Make sure the white high voltage wires, plasma tube, and Spooky Central are as far from the generator and its power supply as possible. If either the high voltage cable of the tube or the tube itself is close to the power supply (or power supply wires) of the generator, the generator may easily lock up.
- The cable from the 5v power adapter acts as an aerial, picking up the signals from Spooky Central. Please ensure the adapter is plugged into a different mains socket outlet.
- Use the special USB and BNC filter cables provided with your Spooky2 Central.
Biofeedback Scan
Biofeedback scan requires a frequency sweep to be input into the body, plus a system to monitor the results of this. As this sweep is being transmitted, it will kill or injure pathogens. Your body registers these events as stress, and each one is clearly recorded.
Spooky2 Pulse BFB Scan
Spooky Pulse is a non-damped cardiac monitor capable of detecting the most minute changes in pulse rate. As the scan sweep progresses, Spooky2 correlates each stress event with the exact frequency that caused it. In Rife, this is called a “hit.” Depending on your settings, it will analyze all the hits, and then select the 10 or 20 that were strongest. The frequencies that cause these problems are assembled into a program that you can save and use to deal with the problems you find.
Please follow the video below to do biofeedback scan with Spooky2 Pulse:
Spooky2 GX Tens Scan
Spooky GX Tens Scan is a non-damped cardiac monitor capable of detecting the most minute changes in pulse rate. As the scan sweep progresses, Spooky2 correlates each stress event with the exact frequency that caused it. In Rife, this is called a “hit.” Depending on your settings, it will analyze all the hits, and then select the 10 or 20 that were strongest. The frequencies that cause these problems are assembled into a program that you can save and use to deal with the problems you find.
Please follow the video below to do biofeedback scan with Spooky2 GX Tens Scan:
Spooky2 Remote Sample BFB Scan
The working principle of Spooky2 Sample Digitizer is similar to Remote mode and is compatible with direct GenX scanning of biological samples (urine, saliva, blood, etc.). Due to the high ratio of pathogens within the biological sample, Spooky2 Sample Digitizer is better suited than TENS scans for finding pathogens in your body.
However, the effectiveness of using Sample Digitizer to run BFB results is not ideal. For this reason, we recommend using proper Spooky2 Remote, plasma, or contact modes to run your scan results.
Please follow the video below to do biofeedback scan with Spooky2 Remote Sample BFB Scan:
What do We Do after We Get Results from Spooky2 Biofeedback Scan
Step 1: Save to Database
Step 2: Run Your Scan Results
Step 3: Do a Reverse Lookup
Click this link for detail: https://www.spooky2-mall.com/blog/what-do-we-do-after-we-get-results-from-biofeedback-scan-using-spooky-pulse/
Understanding Reverse Lookup:
Reverse Lookup is perhaps the most widely misunderstood aspect of Spooky2’s biofeedback feature.
Spooky Pulse biofeedback were never designed to be a diagnostic tool. A diagnosis is useful only to a health professional, not to me or you. Most doctors require it only to look up drugs in their directories which can be used for it.
In other words, a diagnosis is a stepping-stone to a written prescription for a medication or treatment.
Spooky biofeedback skips this step altogether and provides the prescription directly, written by your own body – the frequencies found by your scan.
Reverse Lookup doesn’t provide any sort of a diagnosis. What it actually does is to search the Spooky2 database to find frequencies within the tolerance you specify.
There are certain structures and systems that are common to many pathogens – cells walls and receptors are examples – and certain frequencies target such structures rather than specific organisms.
This means that such frequencies are common to a great many programs, and if such a frequency is found in your scan, Reverse Lookup will return every program that contains the frequency. This does NOT mean you have all the pathogens listed. It only means that the frequency which your body responded to was also found in other programs in the database. If a frequency is not in the database, you would not see any results.